As a crocheter, there are many things I love : a well organised hook case filled with hooks & notions that are useful to the passion; touching yarn even if I am not buying it; leafing through magazines and books to look at patterns; admiring others’ work; starting a new project & seeing it come alive; finishing a project & showing it off… my passion is filled with these lovely moments.
It also contains 3 tasks I would love to do without. And I am convinced that I am not the only one. I believe our kniting cousins hate these same 3 tasks :
3. the gauge swatch
2. weaving ends in
1. blocking
–
I’ll come back to tasks 2 & 3 shortly, because while hated, they are necessary evils (2 is inevitable & 3 is rather useful when making clothing).
Today I want to focus on blocking.
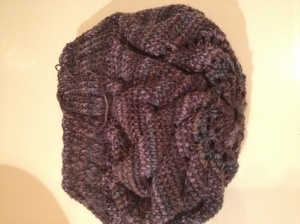
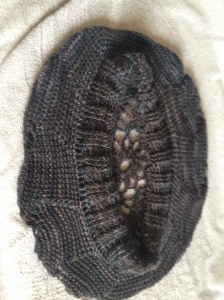
Ok so yeah, it is a tedious process; one which has to be done all over again when you wash your finished object later… but one that changes the entire look of your beautiful stitches, and for the better. As proof, I offer the 2 pictures below.
Above, a ball of yarn that looks like, for all intents and purposes, a lovely yarn brain. I have not taken a photo of this …. thing … on a head, but trust me : it ain’t pretty.
Below, the same yarn brain, after suffering the blocking process : it’s been soaked and shaped to show off the stitches so tenderly crocheted.
Much better, no?
Why block?
Blocking makes your stitches open up. When you crochet, you are essentially winding yarn around itself. If you multiply this winding around by the number of stitches made throughout the item, you can easily understand how your finished item can end up looking like the above yarn brain.
Blocking is also useful before assembling different pieces. It’ll give each piece its finished size & make stitches more visible prior to sewing them up.
You’ll often read that it is useless to block acrylic wool, or that it simply cannot be blocked. This is not true. Acrylic wool will react differently to blocking, sure, but it will react positively all the same.
How to block?
There are different blocking methods, each with its own uses. Here are the main ones :
1. Steaming
2. Laying flat to dry
3. Pinning
In pretty much all crochet books you’ll find a section on blocking. The www also has many resources to understand the process. I’ll briefly explain each, and let you decide which is appropriate for your project.
Before you begin
Always read the care instructions on your yarn label before choosing a method over another. Some acrylic will melt if steamed, for example.
Read your pattern. The recommended blocking method is often written in the pattern itself.
Aside from the steaming method, you block a pre-moistened project. Depending on the yarn, moistness will be less or more. Acrylics will need to be submerged in water; delicate lace will be gently sprayed.
Never ever ever wring out your beautiful crocheted piece! Never. If you are to submerge it prior to blocking, let the drain naturally get rid of most of the water, then place your item on a towel and roll it up like a sushi to remove the excess water.
1. Steaming
Delicate yarns will most often be blocked with an iron on the steam setting. You will not be ironing the piece, just setting the iron a few inches above and letting the steam do its work. Sometimes, a towel will be placed over the project to further protect the yarn. Read the care instructions carefully & go slowly.
2. Laying flat to dry
You’re already familiar with this for your delicates or other items that don’t go in the dryer. You should remove as much excess water from your item before shaping it and laying it flat to dry, as wet wool is heavy & you do not want to pull your piece out of shape as it dries.
3. Pinning
This is the method that offers the best results. It is also the most hated of all. It is tedious, long, boring, but required if you’ve crocheted a lovely lace shawl… or to make sure the measurements of different pieces match before assembly.
For this method, you’ll need a measuring tape, many (many!) rust-proof pins, and a surface on which to pin. Guest-room beds are a good option. Foam puzzle pieces another, but be wary of colour transfers! Your LYS and the www also offer pinning mats & other fantastic useful notions. I personally use knitpic’s blocking mats & pins. You’ll find the tools you and your budget prefer.
You will need to soak your item & remove the excess water prior to pinning. Once your item is ready, use your measuring tape to make beautiful straight lines, and to reach the required size. Pins should be close together to avoir your edge pulling in between each one.
Then you wait. And wait. And finally, when your item is dry, you remove the pins & admire the result; or remove the pins, assemble the pieces, and admire your work.
—
So there you have it. Nothing very complicated, but oh! how your finished projects will look once you include blocking in your craft!


One thought on “Resources : Things crocheters hate to do (part 1)”
Wowwwww thank you so much !!!! Didnt know we had to block our work ;((( ouffff…thats helpfull ;))))